
At some point in your IoT project, you will need to create or update the modules of the IoT Edge devices. When you only have one or two devices, it is possible to do this by hand. But when more and more devices are added, it becomes impossible to do this by hand. This can be solved with IoT Edge automatic deployments.
The IoT Edge automatic deployments can be compared with a predefined installation guideline for IoT Edge devices. In Azure there are two possibilities: a deployment or a layered deployment. In this article, I will explain the different possibilities and walk you through the steps.
Deployment
When creating an IoT Edge automatic deployment, you will define a deployment manifest with preconfigured tags, modules and routes. The manifest also contains target conditions to specify the devices it will be applied to. If a device is targeted by multiple deployment manifests, then the manifest with the highest priority is used.
To explain the deployment, have a look at the image below. At the left there are different deployments defined in the IoT hub, the columns represent different device types. The first column contains a device type that only has an elevator, the second device type has an elevator and a motion sensor, and so on. Because there are many different device types, each device type must have its own deployment. I’m talking specifically about device type because when there are two devices with the same device type, they can have the same deployment. But different device types can’t have the same deployment or they’re missing functionality.
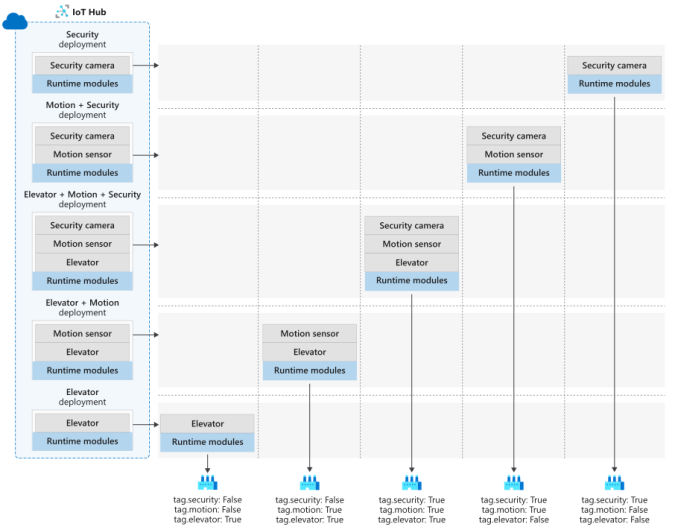
When your solution has many device types, you will need to create many different deployments because the deployments cannot be combined. If this is the case, it is better to combine it with layered deployments.
Layered deployment
Layered deployments are more or less the same as a single deployment. The big difference is that layered deployments can be combined to reduce the number of deployments. So, one device can have multiple layered deployments.
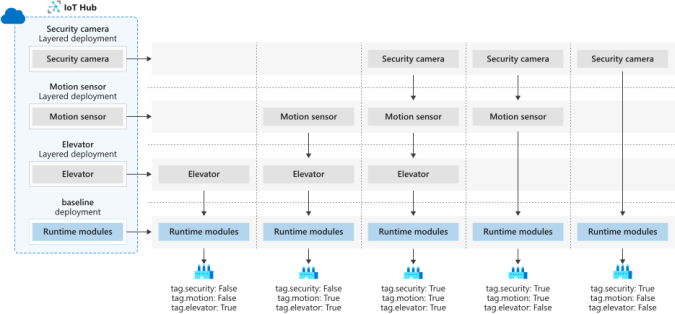
Again, to explain the layered deployment, have a look at the image below. At the left there are different layered deployments defined, the columns still represent different device types. The first thing that stands out is the reduced number of layered deployments compared to the single deployment. This is because the layered deployment “elevator” can be used for different device types which hold an elevator.
When using layered deployments, you are far more flexible in your deployments. That’s why I will walk you through the steps of creating layered deployments.
Walkthrough
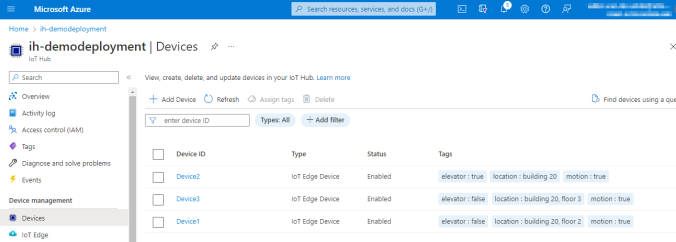
The goal of this walkthrough is to create a (layered) deployment for the elevator and one for the motion sensor. I already created an IoT hub and a couple of IoT Edge devices, as seen in the screenshot below. I also added tags to the devices, so we can target specific devices with the layered deployment.
Create a deployment
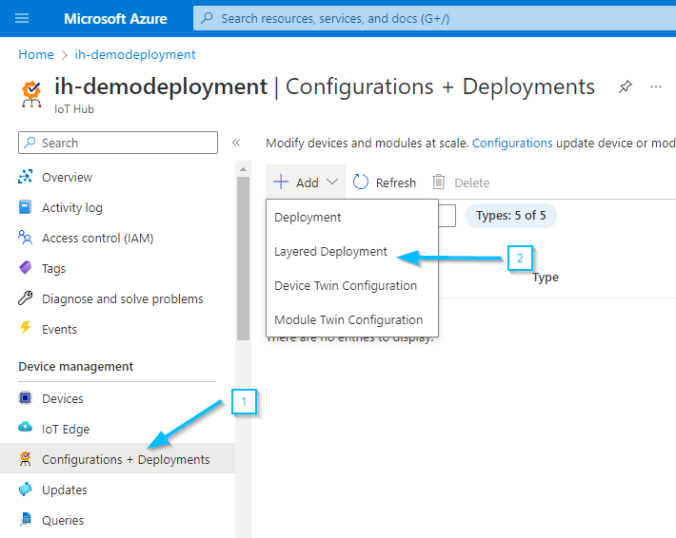
First, we create a deployment as a baseline. This is, at least, necessary to deploy the Edge Agent and Edge Hub. Open the IoT hub and select Configurations + Deployments in the menu to the left (no. 1 in the screenshot below). Then, select Add > Deployment (no. 2 in the screenshot below).

I will start by creating a deployment baseline by filling in the name and a label:

The next step is to define the container registry and modules. This deployment is only to install the Edge Agent and Edge Hub so in this case I don’t configure any other modules. It is possible to change the settings of the Edge Agend or Edge Hub by selecting Runtime settings.

A new window will appear where you can change the settings like the container create options. For now we leave them as-is.

Next, we need to define the priority to 1. If a device is targeted by multiple deployment manifests, then the manifest with the highest priority is used. Because we want to target every device, we set the target condition to tags.elevator != '':

Next go to Review + create. If all validations pass, we can create the deployment.
The deployment we just created will appear in the overview. It may take a while before the data (system- and device metrics) is refreshed in the overview. But eventually it will look something like this:

Now we have the baseline configured, we also need to add a layered deployment in the next chapter.
Create a layered deployment
To create a layered deployment, select Add > Layered Deployment (no. 2 in the screenshot below).
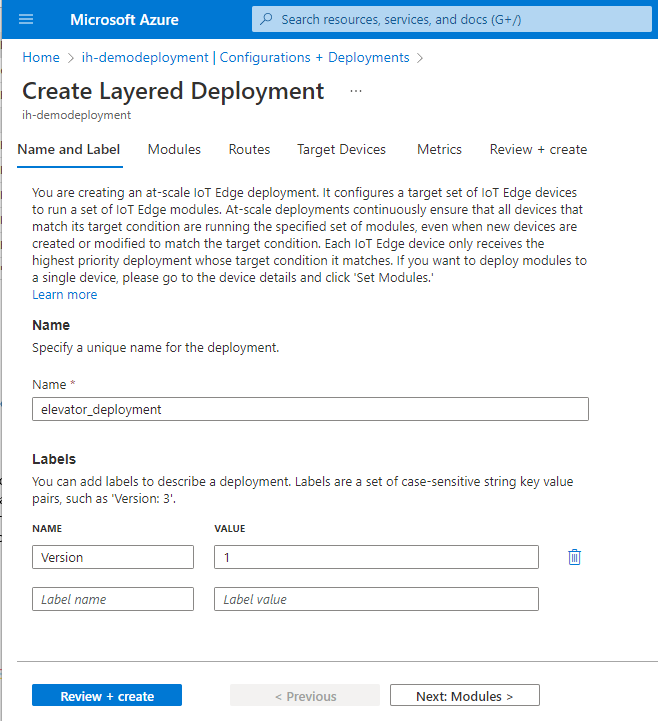
I will start by creating a layered deployment for the elevator by filling in the name and a label:
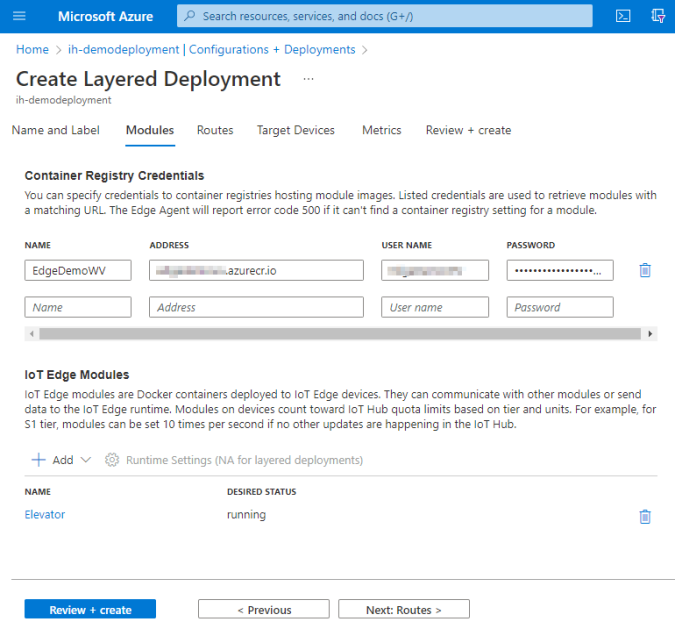
The next step is to define the container registry and modules. Because we are creating a layered deployment for the elevator, we only add the module for the elevator. Later in this walkthrough, we will add the layered deployment for the motion sensor.
If you're not familiar with configuring modules, please look at the Microsoft documentation: https://learn.microsoft.com/en-us/azure/iot-edge/how-to-deploy-modules-portal?view=iotedge-1.4
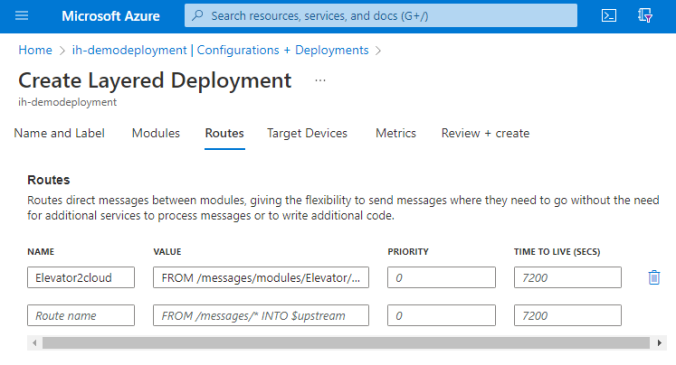
We need to define the routes in the next step. In this case, the elevator module will be redirected directly to the cloud:
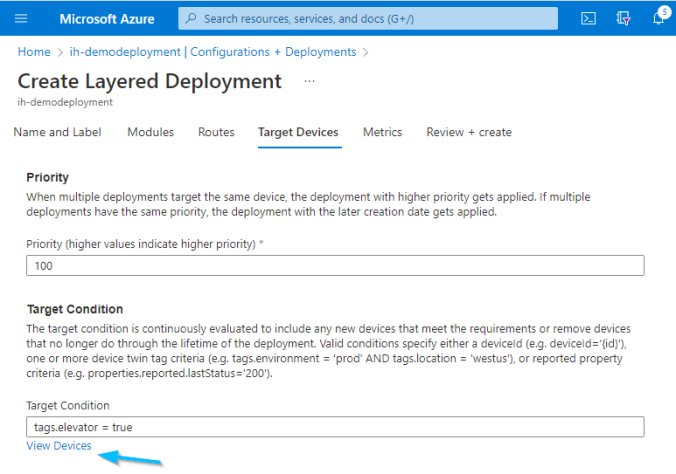
Next, we need to define the target devices by entering the target condition. The conditions are based on device twin tags or device twin reported properties. In our case, we want to filter only the devices that have an elevator. So, I used the tag elevator that I specified at the device.
To check the condition, you can select View Devices:
A new window will open with the devices which are targeted:
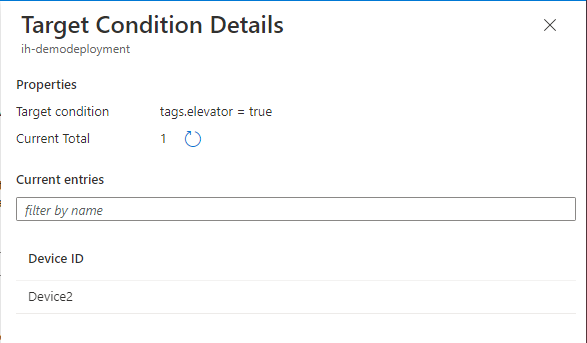
In this case, we only target Device2. Let’s close the window with selected devices.
Next go to Review + create. If all validations pass, we can create the layered deployment.
The layered deployment we just created will appear in the overview. It may take a while before the data (system- and device metrics) is refreshed in the overview. But eventually it will look something like this:

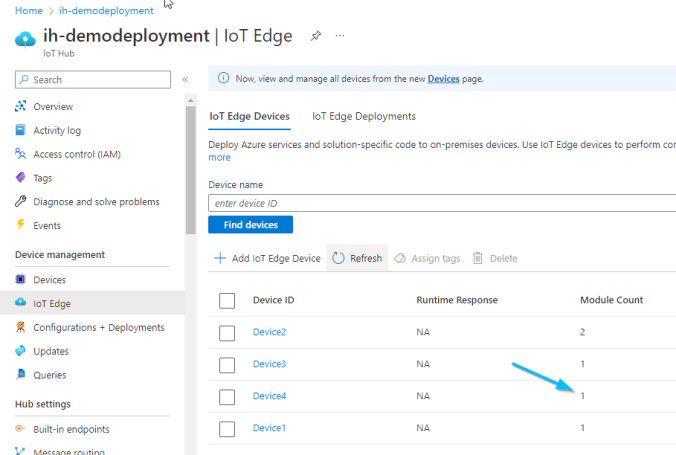
The overview shows that one device is targeted, and it is already applied. So, let’s check the IoT Edge devices by selecting IoT Edge in the left menu. In the device overview, we already see that 1 module is deployed at Device2:
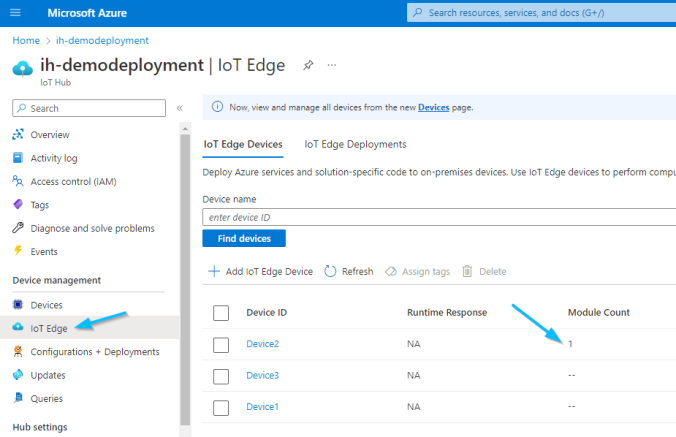
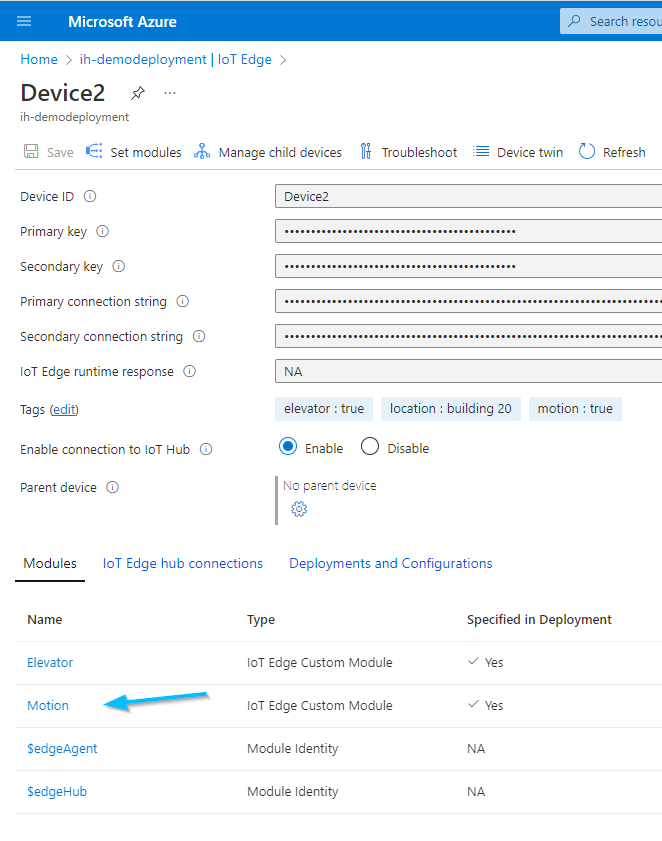
Select Device2, to verify that this is the module we defined in the deployment. The screenshot below shows that module elevator has indeed been added.

The first layered deployment is now ready, let’s create a second layered deployment for the motion sensor.
Create a second layered deployment
Go back to the Configurations + Deployments and add another Layered Deployment. The first steps are the same as for the elevator deployment, I only changed the names and added the motion sensor module instead of the elevator module. The most important difference is in the target devices tab, where I defined another target condition:
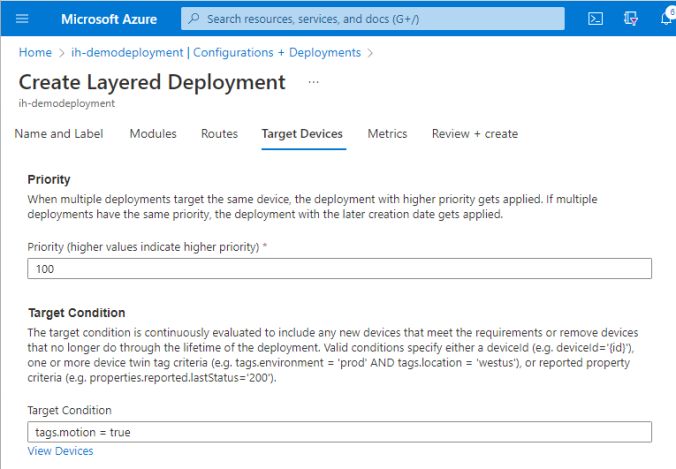
This target condition will target all my devices, because all devices have a motion sensor. When we create this layered deployment, and wait for a minute, the overview will look like:

As expected, all three devices are targeted. So, let’s check the IoT Edge devices again. In the device overview, we already see that 2 modules are deployed at Device2 and 1 module to the other devices:
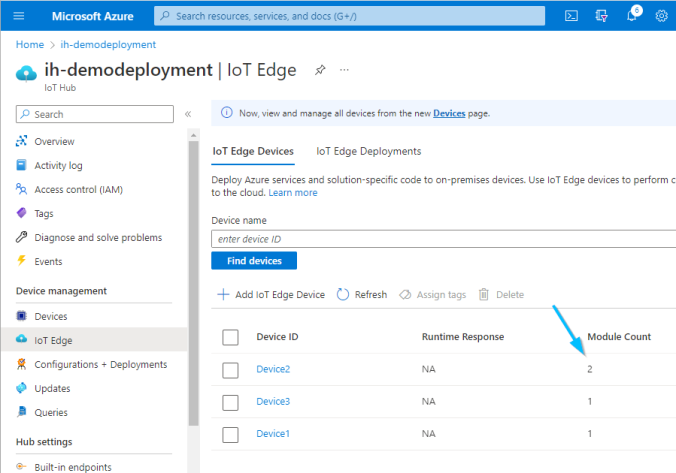
Select Device2, to verify that both modules are deployed. The screenshot below shows that module motion has been added.
Add a new device
One of the benefits of layered deployments is that the target conditions are continuously being evaluated. So when a device changes or when a new device will be added, it will automatically check the target conditions and apply the layered deployments.
To check this functionality, I created a new IoT Edge device and waited…. After a couple of minutes, the deployment was applied to the device:
Conclusion
This walkthrough contains a simple example of how to use layered deployments to automate module deployments for IoT Edge devices at scale. In real life you probably need more complex configurations (more modules, routes, etc.) and this is also possible. But for convenience, I have now kept the showcase simple.
Also take a look at part 2: automatically-deploy-layered-deployments-to-azure-iot-hub

1 Pingback